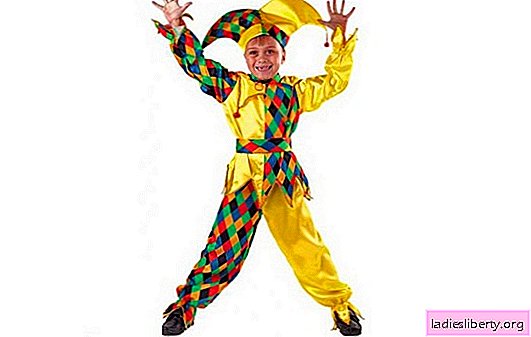
Costume Parsley is a costume of a mocker and a farce jester. When parents or teachers choose this image for the child, it means that they want to see a cheerful guy, witty and nimble in words. The costume should be in every way possible with its bright colors and unexpected combinations.
That is why this hero often has one leg of one color and another of a completely different one. Multi-colored boots are dressed on his feet, and two multi-colored cones crown the cap. Parsley is decorated as they can. Collars, bells and funny shoes add to the costume.
DIY parsley costume for a boy: caftan and pants
A suit in the form of a separate sweater and pants should be combined with each other. Choose two color options:
- jacket of one color, and pants of another;
- jacket and pants on one side of the same color, and on the second side of the other.
For the first and second options, the pattern will need the same.

Option 1

The first option is much easier to sew, because it is a wide caftan, which is sewn according to simple patterns of a usual slightly elongated jacket with sleeves. Pants in the first and second version are sewn the same way, the difference is only in the fabrics.
Stage 1
Measure your child: the height of the product from shoulder to hip, the length of the sleeve from the shoulder to the wrist, the circumference of the collar, the circumference of the chest, plus a lap for free wear.
Here, take measurements for sewing trousers: the length from the waist to the ankle plus the inlet on the back of the thigh, the circumference of the thigh and the circumference of the leg, as well as the length of the leg from the inguinal to the ankle.
Stage 2
Transfer the dimensions to the fabric, draw the details according to the pattern and cut.
Stage 3
Sew the resulting parts together. Work and tuck the cut edge of the collar, hem and sleeve. Sew them on the sewing machine.
On the pants, tuck the elastic into the tucked-up edge of the belt. She must support the pants so that they do not fall. In the lower part of the ankle, it is not necessary to sew an elastic band, if desired. But do not leave the cut edge unprocessed, otherwise the threads will fluff out and come out.
You can add a collar to the jacket, which is made and sewn separately, on the finished product. Also, the bottom of the sweater and sleeves can be made not straight, but cut off in zigzags or triangles. In this case, for such decoration, add an additional 10 cm to the length for the pattern, otherwise there will not be enough fabric.
In order to make a collar, cut out slightly colored pentagons from multi-colored fabric. Sew them along the side line between each other, alternating the colors in a checkerboard pattern. You will get a semicircle of colorful parts. Tuck and stitch the bottom cut edge of the collar, and along the top line, sew it along the neck of the sweater, tucking the cut edge inward.
Option 2

This jacket and pants will be on one half of the same color, and on the other half of the other. This complicates the work, but not much.
Stage 1
For sweaters, choose two contrasting colors of fabric of the same quality. The same fabric will be used for pants. Fold them face to face and sew one side. This seam will replace the folded edge of the fabric when drawing the pattern. Draw a line of a pattern taking into account a stitched seam. Cut out the resulting parts. When turning in the middle of each part, a seam should pass, stitching the multi-colored sides of the jacket with each other.
When sewing pants, fold the two fabric colors in the same way to the front side and then fold everything in half. Draw a pattern and cut out the details. You should get two parts, one from each fabric.
Stage 2
Sew together the details of the sweater and trousers. When sewing sweaters, the body parts are first sewn together, and then the sleeve is attached to the armhole. Cut edges are tucked and stitched.
The trousers are sewn first with a short upper side seam, and then the trousers are rotated and stitched inside from the groin towards the ankle. A gum is sewn into the belt, and optionally into the legs. If you don’t sew the elastic in your legs, then the trousers will remain straight.
As in the first version, the suit can be supplemented with a multi-colored collar and zigzag sleeves and the same hem of the sweater. The slice on the bottom of the pants can also be made into triangles.
DIY parsley costume for a boy: jumpsuit

Overalls are a one-piece suit where the jacket goes into pants. Overalls are sewn with whole details here on such a pattern.

It is extremely important here not to make a mistake with the dimensions, so when sewing overalls, you need to correctly take and transfer the measurements.
Stage 1
Measure your child: the height of the proposed product is measured from the shoulder to the ankle with an allowance of 15-20 cm, the length of the sleeve from the shoulder to the hand, the length of the leg from the groin to the ankle, the circumference of the collar, the circumference of the chest, thighs and allowances with an allowance of 15-20 see for freedom of movement.
As in the previous suit, the sleeves and the cut at the ankle can be decorated with an uneven edge in the form of elongated triangles. You need to think over such elements in advance before you start cutting out details from fabric. Add to the measurement the length of the sleeve and the length of the leg of 10-15 cm additionally on the decorative cut.
Stage 2
It is important to use a fabric of two colors, which will lie on one half of the body with one color, and on the other with another color. To obtain this effect, fold the two colors of fabric on top of each other inward and sew one edge on the sewing machine. This edge will serve as the curled side when drawing the contour of the pattern on the fabric.
Stage 3
Take measurements and draw a pattern on the fabric. Cut out the details.
Stage 4
Sew the parts together and twist the product.
Stage 5
Tuck and stitch a section of the sleeve, collar and bottom of the pants. If the cut is curly, then following the pattern, process the edge on a sewing machine.
Stage 6
Sew the elastic into the sleeves and pants at the ankles. You can sew in an elastic band above the edge, then the uneven cut will look richer and more magnificent.
Sew large buttons or boombones on your stomach vertically in three rows, the collar can be decorated with lush frills or colored pentagons as in the previous version of the costume.
DIY parsley costume for a boy: cap

Cap or hat in a suit Parsley mandatory element. It is made of the same fabric from which the costume is made and in the same color scheme.
Stage 1
Measure head depth and head circumference. Divide the results by 2 and apply the cap outline to the fabric in accordance with the pattern and cut it. You should get two parts of the same color, two parts of a different color and a base.

Stage 2
Sew the hood parts together, and then sew the base around the circumference. Fold the bottom edge and secure the lapel manually, making small stripes on the sides.
Stage 3
Sew the bombs or bells on the edges of the hood.
DIY parsley costume for a boy: shoes

For completeness, you can make shoes under the suit of Parsley for a boy with your own hands. They are made from felt or from the same fabric as the costume. In order to prevent the child’s foot from freezing, a warm insole is inserted into the shoes or they are worn over removable shoes. This is especially important if the boots are made of thin fabric.
Stage 1
On the fabric, draw the outline of the details of the pattern.

Stage 2
Cut out the parts and sew them together. Garnish the sharp noses with bells and the tongue with a bow made of satin ribbon.
The color of the shoes, as well as the suit may be different. On one leg is a boot of one color, and on the other leg is a different color.